Wednesday, August 29, 2018

WIP - Mermaid

I've been quiet lately as I have been working on my mermaid doll for the Doll Street Club challenge. Things are moving along slowly.

It's a good thing I still have until September 15th. Doll makers will tell you that sometimes the doll you are making has very definite ideas about what it wants to look like. I know that sounds weird but it's true. I have changed her look so many times but I think I'm okay with what I have now......on the bottom bit anyway. Her very bodacious top part is giving me grief.

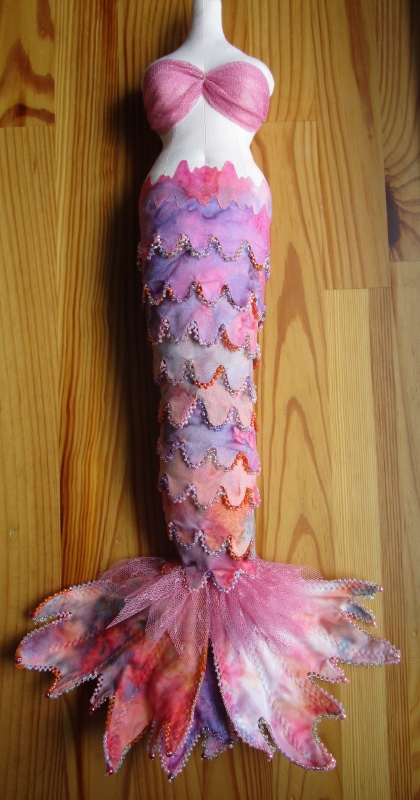
She is from a pattern by Patti Medaris Culea. Patti did a lot more complicated beading than I have done. I kept it simple by only doing an edging. It turned out that I was very limited in my bead selection as I wanted to use what I already had. I picked out six colours that sort of matched the fabric.

I had some issues with the 7 separate "scaled" pieces that you are supposed to wrap around the tail. Hmmm.
 
After attempting that a few times I gave up. I didn't like the look with all the closed end bits showing up on the front here and there. It was sort of unavoidable if you wanted to cover the tail with them??? I felt it looked unfinished.

I ended up unpicking each end of the 7 bits and sewing them altogether into one strip. Even then it wasn't quite long enough to cover the tail even spreading the strip out as much as possible. Annoying. I didn't have any more fabric to try something else so I decided to go with what I had.

Then I had a problem. I didn't want to use Patti's idea for covering the raw seam between the torso and the tail. She used synthetic organza chiffon. She sealed the edges using a candle. It's very pretty but I couldn't see myself doing that...OMG. A disaster waiting to happen...LOL 
 
To fill in the gap from the end of the strip to her body I decided to use what the pattern designer had already provided. The actual pattern piece for the tail had an edging but the directions told you not to use it. To cut the edge straight instead. Which I did. So I cut a scrap of the fabric using the pattern piece. Then I used "Wonder-Under Pellon transfer web to attach it to her torso. It was pretty old stuff but it still worked.


Still needs something though....sigh. Tried a jeweled belt sort of thing but not quite right.

Still a work in progress. 

Take care:)

Monday, August 13, 2018

WIP ...........

The doll club that I belong to is having a mermaid challenge. I decided to use a pattern from "Creative Cloth Doll Beading" by Patti Medaris Culea. The doll is called Franalizia of the North...you can see a pic here.

Obviously there will be beading involved. Nothing too complex. I've chosen a piece of batik that I bought at a quilt show some years ago. It's got shades of pink, orange, peach, purple and even a gray blue. I'm not a fan of pink but the other colours sort of make it okay. I do have a lot of beads I'd like to use up so this is a great project to do that:)

I have all the mermaid tail pieces sewn. There are a lot of fins as you can see. Now to touch up a bit with my iron, do some top stitching for wiring in the fins and start beading.

This should keep me busy for awhile....LOL 

Take care:)

Saturday, August 11, 2018

TUSAL 2018

Well it's time for TUSAL. To learn more about TUSAL go here to Daffycat's blog.
 
My ORT jar......
"The Full Moon in August is named after North America's largest fish, the lake sturgeon. Other names for this Full Moon include Grain Moon, Green Corn Moon, Fruit Moon, and Barley Moon."

This is what a Lake Sturgeon looks like. They are very weird looking and also they get very big.  
Source
See what I mean. To read more about this particular fish go here........LINK.

On another note I thought you might like to meet my Quality Control Manager:)

Take care:)

Thursday, August 2, 2018

A finish......

A few posts back I mentioned I was making a dragon. I have finally finished him.

The pattern was by a designer called Melinda Small Patterson. The pattern was so well drafted that it came together perfectly.

Originally I chickened out and decided to make the head without an open mouth...big fail. It turned out very weird looking.
I decided to go for it and after all that angst it turned out to be fairly simple to make. As long as you read and follow the directions...I will fully admit not something that I am good at. After reading them aloud several times until my son had definitely thought I was losing it...it twigged.

I decided to use some small commercial cat eyes I had in my stash. I took the existing paint off the back using nail polish remover. I then repainted them with Lumiere by Jacquard. I tried a few colours but decided that the Sunset Gold was best with my fabric.

Instead of struggling with making the eyes on the actual head I decided I would make them in another way. I glued the cat eyes (after removing the shanks) onto a scrap of my fabric and then I hand sewed the strips made from the pattern pieces supplied. I carefully cut out my eye from the backing. 

This is what I ended up with. A bit rough but once glued to the head it looked very good.

The pattern supplies templates for drawing and sewing the veins in the wings. I decided to use freezer paper instead because my fabric is dark. It seemed easier than using a fabric marker that my old eyes wouldn't be able to see:) .

I also forgot to sew the tail end bit before I turned the body...ooops. It was difficult enough turning it because of that narrow tail but I just added more difficulty by quilting the chest area.
I used a thin batting that I think is called "Warm & Natural". It's almost like a thick pellon or felt. I guess felt would work too.
My mistake with the tail was serendipitous actually. I intend to stuff the tail rather than use sand as the pattern suggests. I also want to use an armature so the open tail will work out better. See how I rationalize my mistakes....LOL If I read all the directions first I wouldn't have as many ooops moments.

I had some issues with the wings though. I think I may have overstuffed them and made them a bit too heavy. I had to unpick the buttons a few times trying to get them tighter so that I could pose them.They keep on flopping down. Next time I might make the wing in one piece and then wire them.

So here he is.


I haven't named him yet. Apparently a dragon will never tell you his name because then you have power over him...or so I've been told :)

Take care.