Showing posts with label Dragons. Show all posts

Thursday, August 2, 2018

A finish......

A few posts back I mentioned I was making a dragon. I have finally finished him.

The pattern was by a designer called Melinda Small Patterson. The pattern was so well drafted that it came together perfectly.

Originally I chickened out and decided to make the head without an open mouth...big fail. It turned out very weird looking.
I decided to go for it and after all that angst it turned out to be fairly simple to make. As long as you read and follow the directions...I will fully admit not something that I am good at. After reading them aloud several times until my son had definitely thought I was losing it...it twigged.

I decided to use some small commercial cat eyes I had in my stash. I took the existing paint off the back using nail polish remover. I then repainted them with Lumiere by Jacquard. I tried a few colours but decided that the Sunset Gold was best with my fabric.

Instead of struggling with making the eyes on the actual head I decided I would make them in another way. I glued the cat eyes (after removing the shanks) onto a scrap of my fabric and then I hand sewed the strips made from the pattern pieces supplied. I carefully cut out my eye from the backing. 

This is what I ended up with. A bit rough but once glued to the head it looked very good.

The pattern supplies templates for drawing and sewing the veins in the wings. I decided to use freezer paper instead because my fabric is dark. It seemed easier than using a fabric marker that my old eyes wouldn't be able to see:) .

I also forgot to sew the tail end bit before I turned the body...ooops. It was difficult enough turning it because of that narrow tail but I just added more difficulty by quilting the chest area.
I used a thin batting that I think is called "Warm & Natural". It's almost like a thick pellon or felt. I guess felt would work too.
My mistake with the tail was serendipitous actually. I intend to stuff the tail rather than use sand as the pattern suggests. I also want to use an armature so the open tail will work out better. See how I rationalize my mistakes....LOL If I read all the directions first I wouldn't have as many ooops moments.

I had some issues with the wings though. I think I may have overstuffed them and made them a bit too heavy. I had to unpick the buttons a few times trying to get them tighter so that I could pose them.They keep on flopping down. Next time I might make the wing in one piece and then wire them.

So here he is.
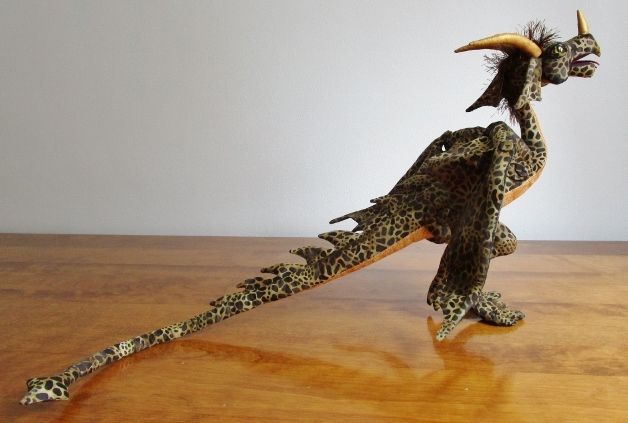


I haven't named him yet. Apparently a dragon will never tell you his name because then you have power over him...or so I've been told :)

Take care.


Sunday, July 1, 2018

WIP.......and Happy Canada Day to my fellow Canadians.....


Source


I've been re-reading the whole "Realm of the Elderlings" series of books by Robin Hobb.
I just finished her "Rain Wild Chronicle" books....The Dragon Keeper, Dragon Haven, City of Dragons and Blood of Dragons.

I've also just finished watching the seventh season of Game of Thrones on blue ray. OMG eeeeek!!! The ending!!!!

So of course now I really want to make a dragon

I'm using a pattern by Melinda Small Patterson.

I've noticed that some doll makers add arms in addition to the wings but I'm leaning towards making it as Melinda designed it. Her dragon is more like Smaug from the Hobbits or the dragons from Game of Thrones. At this point I haven't decided if I want to make it with the mouth opened or closed.

I found some batik fabric at my local quilt shop with a print that looks very dragonish. I think so anyway.
When finished this dragon will be about 28 inches long and a foot high. Sorry I still don't use metric in sewing. Old habits etc.

My online doll club asked that we post pictures on their site of our sewing rooms. I thought you'd like to see where I sew too. I have got rid of a ton of stuff over the last few years as we are planning to sell this house and move closer to my son....and most importantly....my granddaughter :)

I have a small front bedroom with a window that looks out on the street. It's nice to watch people passing when I sew.

My laptop, TV and some upright storage drawers on wheels.

My bookshelf full of books on doll making, embroidery, doll house, crazy quilting and so on. My cutting table with two mini storage boxes that hold my scissors and other necessary tools. My sewing machines and one more upright storage unit. 
Two big shelves built into an alcove to hold my fabric, stuffing and WIPs. Underneath those big bins hold larger bits of fabric and fake fur etc.
That bin on the bottom left usually has a cat sleeping on it.

I try to keep my room as tidy as possible because I'm not very creative if I have a mess around me.

Hoped you enjoyed my mini tour. Take care :)